Java Programming
Introduction > Running your first application with VisualCafe
Now that we have managed to write and execute a java application using the JDK, VisualCafé should present little challenge. Even though it may not seem "elite" to allow oneself to be babied by a development environment such as WebGain's VisualCafé 4, there is really no rational reason to resist a development method that reduces the time it takes to compile, run, write and deploy applications. Furthermore the entire source writing/compiling process tends to become extremely time consuming when your project contains more than one class file and you are constantly switching from one application component to the next since each file needs to be opened, saved and compiled seperately every single time a change needs to be made. You should however be aware that VisualCafé is extremely demanding on your system and requires a massive amount of RAM to be fully satisfied.
To create the same "Hello world!" application we built using the JDK you will have to create a new VisualCafé project of type "Empty Project", by either selecting that type of project from the initial window you are presented with when entering VisualCafé or by selecting File>New Project... from the menu bar and then selecting "OK" from that dialog box. Since all the applications we will be creating throughout this guide will require a project of type "Empty Project", it may be a good idea to set that type of project as the default project (by clicking on the "Set Default" button which appears in the New Project dialog box).
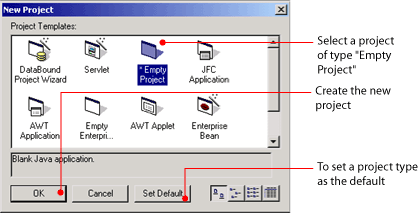 |
| Figure 1.2: The VisualCafé New Project dialog box |
Once you have created a new project, you should be presented with a workspace similar to the following:
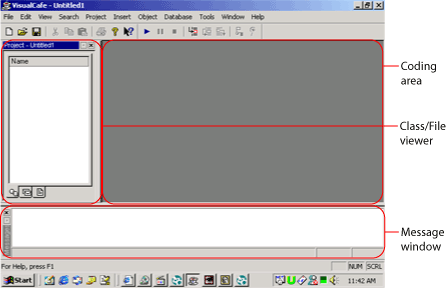 |
| Figure 1.3: VisualCafé Workspace Components |
In order to begin entering the code, you will have to create a new class file by selecting Insert>Class..., typing "Hello" in the name field and simply clicking on "Finish" in the dialog box that appears. A new object should now appear in the class/file viewer (see figure 1.3) and you may open that source code file by simply double clicking on it. The editing may now be done in the coding area (see figure 1.3).
Once you have transcribed the code for the Hello world application into the coding area, you must save the project since it is necessary to do so before attempting to execute it. To save the project, simply select File>Save All from and be sure to give your project the same name as the main class (in this case it would be called Hello.vep). You may now run the application by selecting Project>Execute or by pressing Ctrl+F5. If all goes well, a console (command prompt) window should now appear with the output "Hello world!". If there were any errors, they will be displayed in the message window (see figure 1.3). By interpreting these error messages, you may be able to find the source of your error and proceed to correcting them before attempting to execute the application for a second time. Once again, make sure you have correctly transcribed the source code as it appeared on the previous page of this guide.
If you wish to save time, you can insert a source code file that has already been saved on the hard drive by copying this file into your project directory (by using the windows explorer), selecting Insert>Files into Project..., adding the source code file and clicking on "OK" when you are done. In this way you can use the code you previously typed again. This code can also be downloaded direct from SiliconGuide.